Easter Craft – Photo Bunny
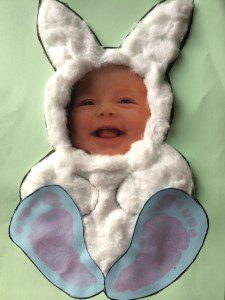
Bring on the Easter Craft! As our regular readers will know – we love a bit of crafting and Easter is the perfect excuse for getting out the paint and having a bit of messy play with your little ones! Despite our daughter being only 9 months old, we have already got into the habit of regularly making things with her – something to keep for when she is older. I can’t wait till she is old enough to be a little more involved with the finishing touches!!!
In the first of our Easter Craft Specials, we made a Photo Easter Bunny – the finished design of which you can see here:

To create your own Easter Craft Photo Bunny you will need:
- Some newspaper (to cover the carpet!)
- Some baby wipes (for getting paint off feet quickly!!)
- Selection of coloured card – (approx £4 for a bumper selection at Hobbycraft)
- Some scissors (or a paper knife if using out of reach of the kids!)
- Glue (preferably like the stuff we used to have at school!)
- Water based paint in the colour of your choice or to make life easier, a giant paint pad
- Cotton Wool (around 12 balls worth maximum)
- A close up photograph of your child’s face.
- A black fineliner or sharpie marker.
Step 1
First you will need to take two footprints from your child – one of each foot. To do this, we recommend that you put newspaper down to protect the carpet – particularly if like Erin, your children are on the move or don’t like to sit still!!! We used a sponge brush to apply pink water based paint to Erins feet, and then stamped onto a blue coloured cardboard. You can use the paint and card colours of your choice. Once dry, cut around the prints, to create two feet.
Step 2
Cut the photograph to make a small border around your childs face (enough so that the cotton wool will hide the rest of the photo.

Step 3
Mock up the bunny design and stick the photograph in place on to the base cardboard as follows. Using a pen or pencil, sketch the rest of the bunny design so you know where to apply the cotton wool.
Like us, you may wish to have a small interval here, particularly if you have a child that likes to look at photographs of herself!!!!

Step 4
To ensure we didn’t waste any cotton wool, we then “mocked up” the amount needed to cover the design, tearing the buds into smaller pieces ready to glue into place.
Step 5
Using the glue, stick footprints into place, and using a generous amount of glue, stick the cotton wool into place to surround the photograph and create the overall bunny design. Once you have finished, it should look a little like this!

Step 6
Once the glue has dried, (which may take some time!) you can highlight around the edges of the design and add bunny arms using a black fine liner or sharpie marker.
And there you have it! A cute little Easter Craft Photo Bunny. The best part for us has to be that Erin giggles every time she sees it, climbing across everything and anything in her way so she can get to it and take a closer look! The grandparents would love this as an Easter card, and its so so easy to do!
Don’t forget to check back for more Easter Craft inspiration coming soon! A great way to keep the kids occupied during the school holidays.

